Building Docker's Network From Scratch: Namespaces, veth Pairs, Bridges, dnsmasq, and iptables

docker run -p 8080:80 nginx gives you an isolated network stack, a private IP, internet access, and a port exposed to the host, all in one line. Add a user defined network (which is what docker compose up sets up for you by default) and you also get DNS resolution by container name for free. It's easy to use and easy to take for granted — the default bridge network Docker gives you out of the box is deliberately the least capable of the three, and doesn't even have that last piece.
I wanted to know what's actually happening under that one line, so I rebuilt it by hand on a bare Ubuntu EC2 box using nothing but ip netns, veth, a Linux bridge, dnsmasq, and iptables. No Docker daemon, no CNI plugin — just the kernel primitives Docker itself is built on.
This post walks through that build: the prerequisite networking concepts, the two mistakes that broke it early on, and the final result — a bridge network with three isolated namespaces that can talk to each other, resolve names, reach the internet, and get reached from the internet.
Prerequisite knowledge: How Linux actually routes and resolves
Skip this section if you're already comfortable with routing tables and resolv.conf. Everything after it assumes this.
Interfaces
A network interface is the kernel's handle for a point where packets enter or leave the machine, a physical NIC like eth0/ens5, or a virtual one like a veth end or a bridge. On its own, an interface is just a name and a device driver: it can be up or down, and it has an MTU, a MAC address, and some queue configuration. It doesn't know anything about IP addressing yet — that's a separate layer bolted on top.
An IP address is what gets attached to an interface afterward, and an interface can even have several, or none. ip a show eth0 shows exactly that: the interface itself, plus whatever addresses have been assigned to it. The address always carries a prefix length (CIDR), and that prefix length matters more than it looks like it should:
inet 192.168.15.1/24   →  "I'm on a /24 network, I know my neighbors"
inet 192.168.15.1/32   →  "I only know about myself"
An IPv4 address is 32 bits, and the number after the slash says how many of those bits are fixed as the network, leaving the rest free for hosts on that network:
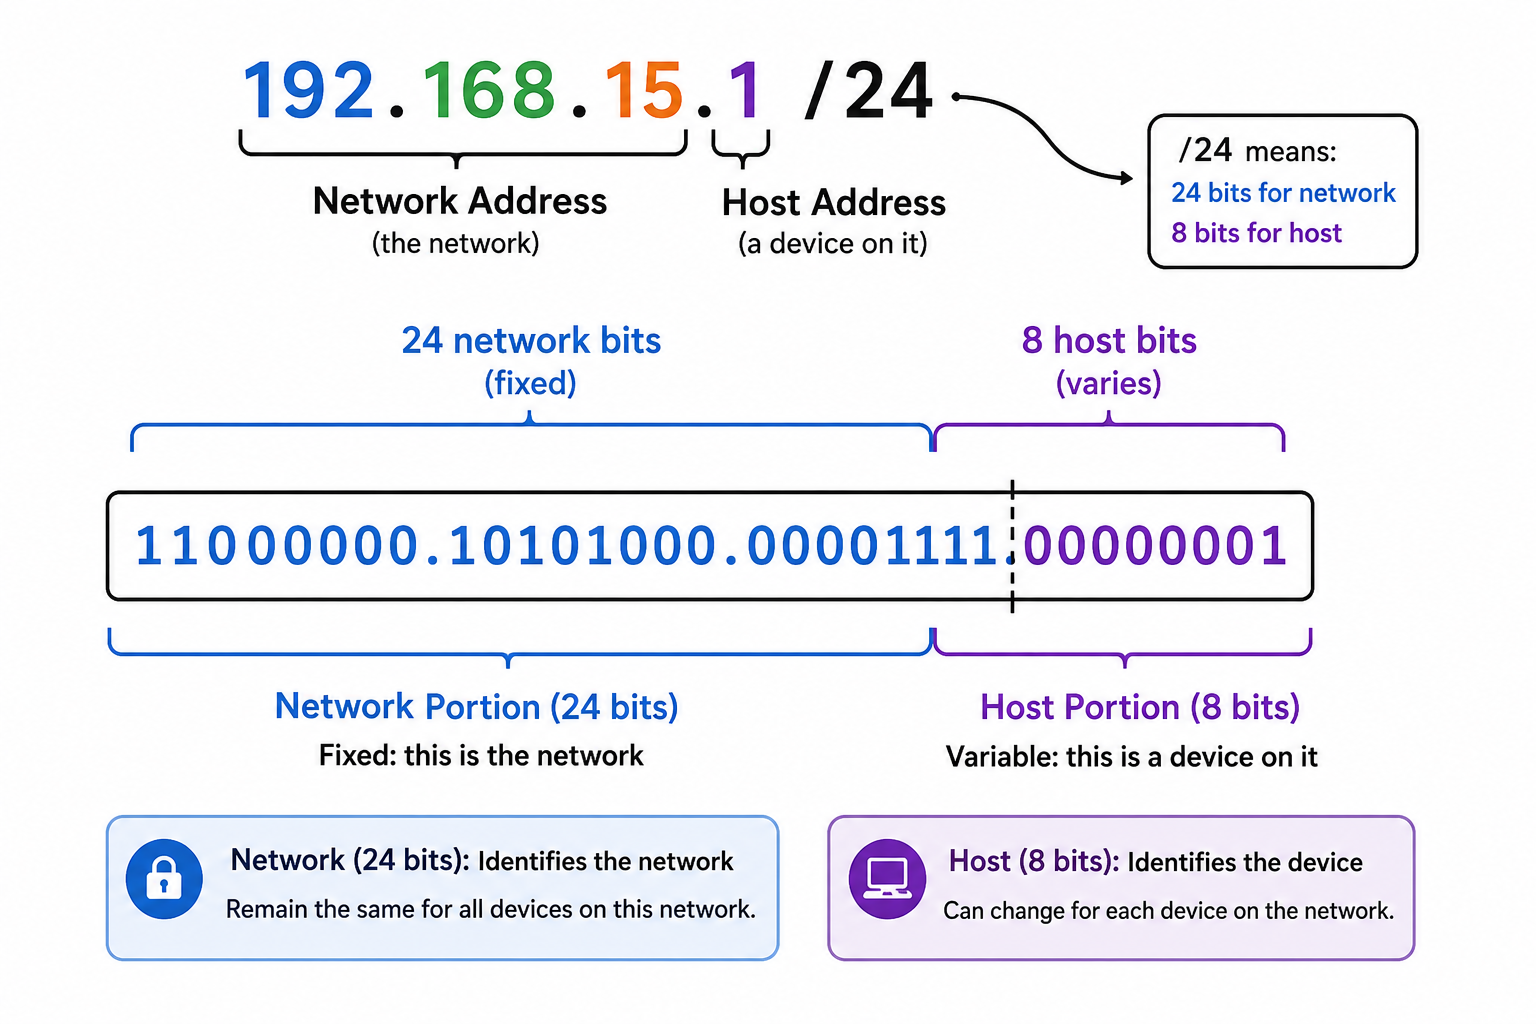
/24 fixes the first 24 bits (192.168.15) as the network and leaves the last 8 bits free — that's 2^8 = 256 possible addresses, i.e. the whole 192.168.15.0–192.168.15.255 range is "local" as far as this interface is concerned. That's what lets the kernel derive a connected route automatically: it can compute the entire neighboring range from the prefix alone.
/32 fixes all 32 bits. Zero bits are left for "host," so there's no range to derive — the address describes exactly one machine (itself) and nothing else. There's no such thing as "the /32 network" containing a neighbor, because a /32 network only ever contains the one address it's attached to.
/32 isn't a smaller version of /24 — it's a network of exactly one address. This distinction is the root cause of the first bug below.
The kernel never ARPs before it routes
ARP (Address Resolution Protocol) is just how a machine finds the MAC address behind an IP on its local network — "who has 192.168.15.2, tell me your MAC" — since actually sending a frame needs a hardware address, not just an IP.
Every outgoing packet goes through the routing table first:
Destination IP
      │
      ▼
Lookup routing table
      │
      ├── No matching route  →  "Network is unreachable" (ARP never attempted)
      │
      └── Route found  →  Need a MAC for next hop?  →  Send ARP request
If there's no route, the kernel gives up before it ever asks "who has this IP" — which means an empty ARP table isn't always an ARP problem.
DNS resolution: /etc/hosts, then resolv.conf
Name resolution on Linux checks, in order:
/etc/hosts— static hostname → IP mappings, no network round-tripWhatever's listed in
/etc/resolv.confasnameserver
On a modern Ubuntu host, /etc/resolv.conf usually just points to:
nameserver 127.0.0.53
127.0.0.53 isn't a real DNS server — it's systemd-resolved, a local stub resolver listening on loopback. That detail is completely invisible until you try to reuse this file somewhere else, which is exactly what breaks namespace DNS later in this post.
The building blocks Docker is made of
Docker's bridge network is a composition of six plain Linux features:
| Docker concept | Linux primitive |
|---|---|
| Container network isolation | network namespaces (ip netns) |
| Container's virtual NIC | veth pairs |
The virtual switch (docker0) |
a Linux bridge |
| Internet access from a container | iptables NAT (MASQUERADE) + IP forwarding |
-p hostPort:containerPort |
iptables DNAT |
| Container name resolution | per-namespace resolv.conf served by Docker's embedded DNS |
Let's build each of these by hand.
One tool, several subcommands: ip
Every command from here on is ip with a different subcommand after it, so it's worth being clear about what each one actually does before running a wall of them back to back.
ip is one binary that manages several different things depending on the noun that follows it:
ip link  ...   → the interface itself (create it, rename it, move it, bring it up/down)
ip addr  ...   → IP addresses attached to an interface
ip route ...   → the routing table
ip netns ...   → network namespaces
ip neigh ...   → the ARP/neighbor cache
ip link never touches an IP address — it only deals with the interface as a device: does it exist, is it up, which namespace does it belong to. ip addr is the layer on top of that, attaching or removing an address from an interface that already exists. That's why creating a veth pair is ip link add, but giving it an IP is a separate ip addr add — they're two different jobs on purpose.
Running a command inside a namespace
A namespace on its own is just an isolated network stack sitting there — you have to explicitly tell a command to run inside it, otherwise it runs against the host's stack as usual. There are two equivalent ways to do that, and both show up in this post:
# form 1: works for any command, not just ip
ip netns exec <namespace> <command>

# form 2: a shortcut, only for ip subcommands
ip -n <namespace> <subcommand>
ip netns exec red ping 192.168.15.2 and ip -n red addr add 192.168.15.1 dev veth-red are doing the same kind of thing: both jump the following command into red's network namespace before running it, instead of the host's. ip netns exec is the general form and works for anything — ping, python3 -m http.server, bash for an interactive shell inside the namespace, whatever. ip -n <namespace> is a shorthand that only exists for ip itself, which is why it's the one you'll see attached to addr/link/route commands and not to things like ping or curl.
So, concretely: if you want to run any command inside a namespace, use ip netns exec <namespace> <command>. But if you only need to run an ip subcommand — ip route, ip link, ip addr, whatever — you can use the shorthand ip -n <namespace> <subcommand> instead.
Step 1 — Direct veth pair
What I did
Two namespaces, red and blue, joined by a veth pair — built one step at a time so each piece is visible before the next one lands on top of it.
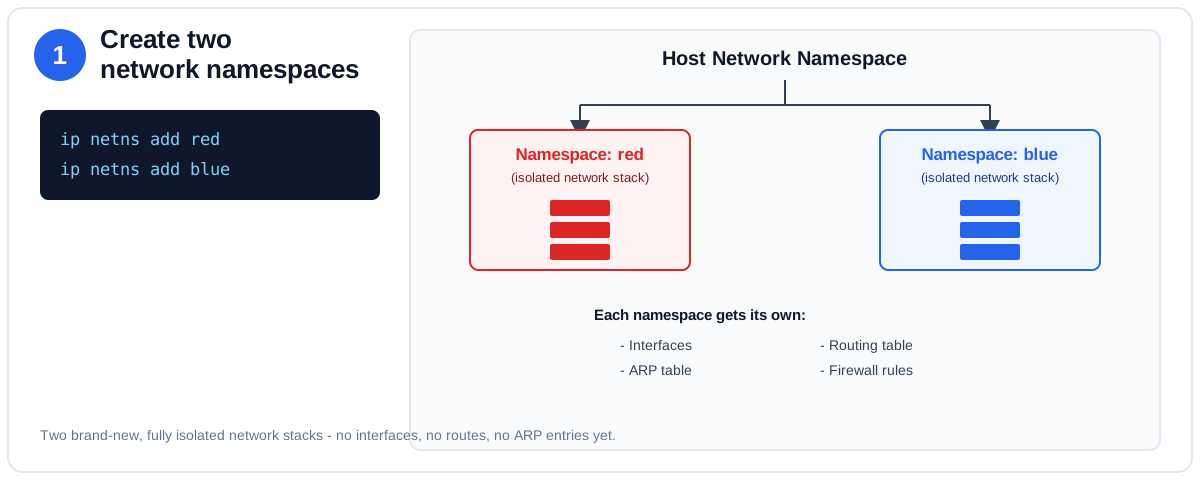
1. Create two network namespaces
ip netns add red
ip netns add blue
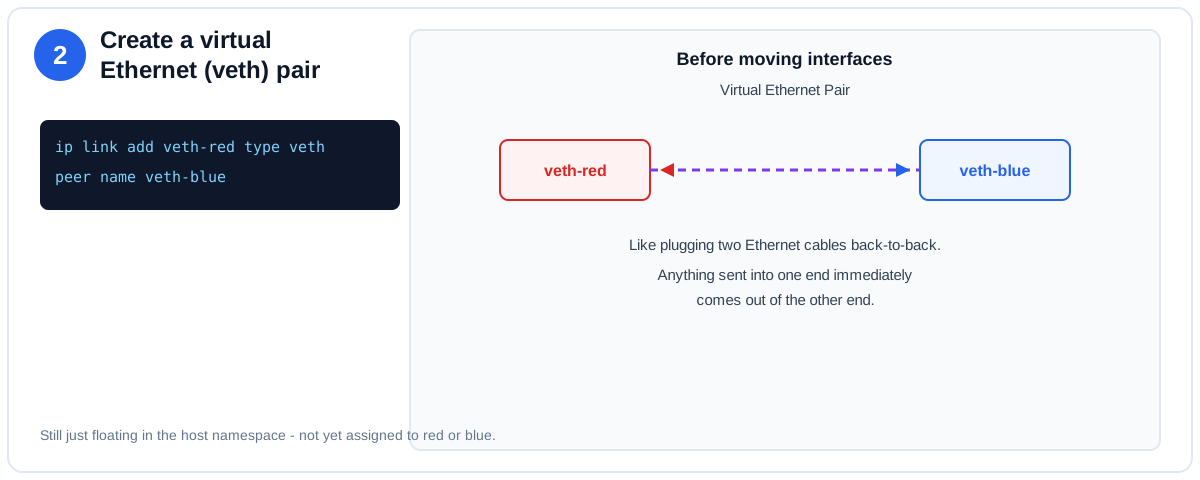
2. Create a virtual Ethernet (veth) pair
ip link add veth-red type veth peer name veth-blue
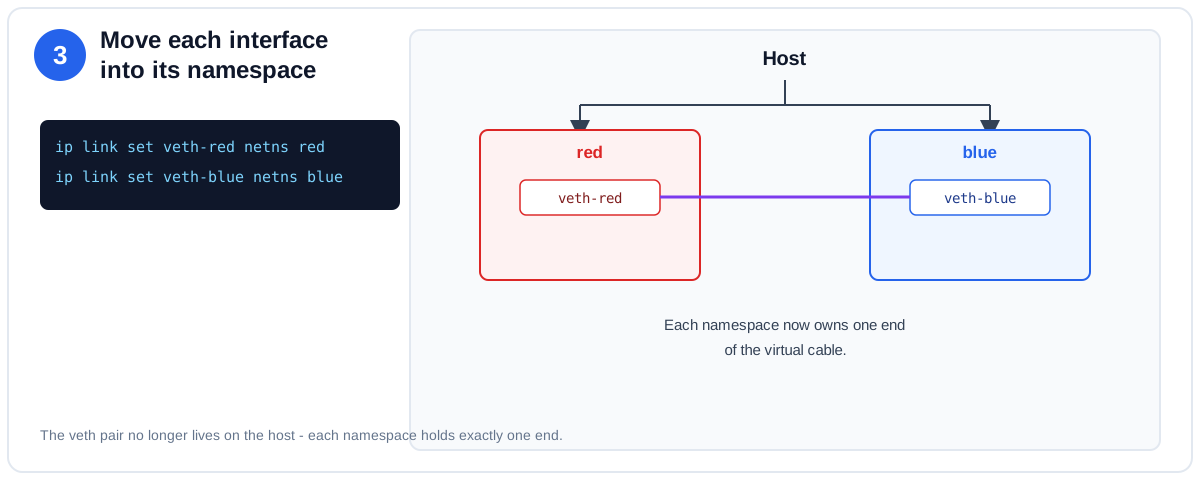
3. Move each interface into its namespace
ip link set veth-red netns red
ip link set veth-blue netns blue
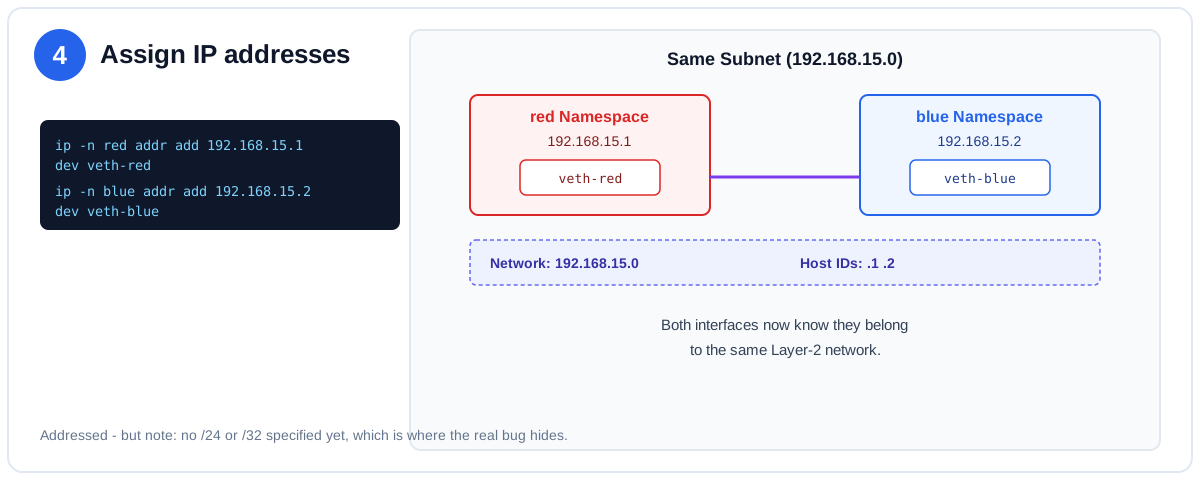
4. Assign IP addresses
ip -n red  addr add 192.168.15.1 dev veth-red
ip -n blue addr add 192.168.15.2 dev veth-blue
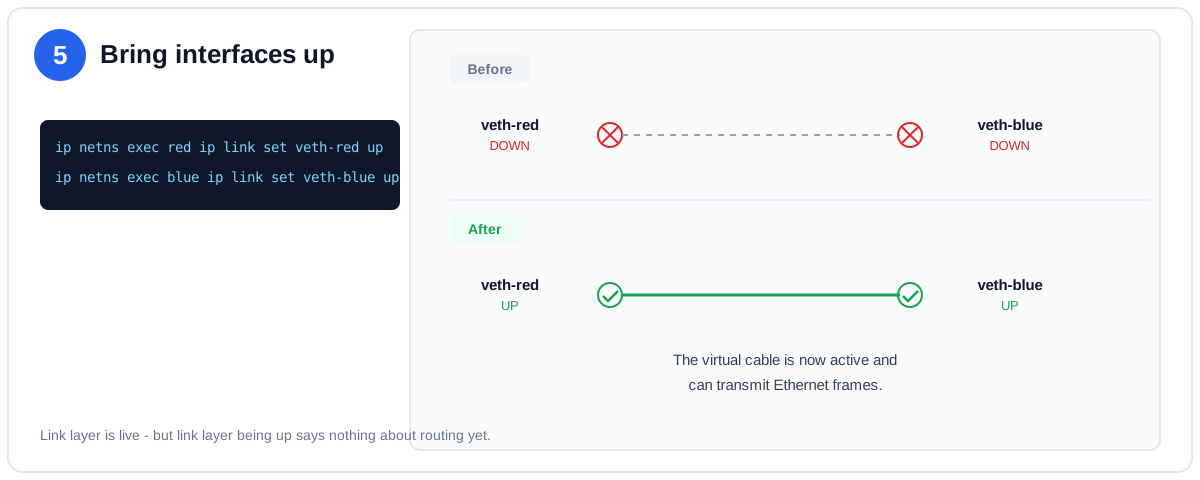
5. Bring interfaces up
ip netns exec red  ip link set veth-red up
ip netns exec blue ip link set veth-blue up
6. Try the ping
Full picture at this point — both namespaces up, addressed, and cabled together:
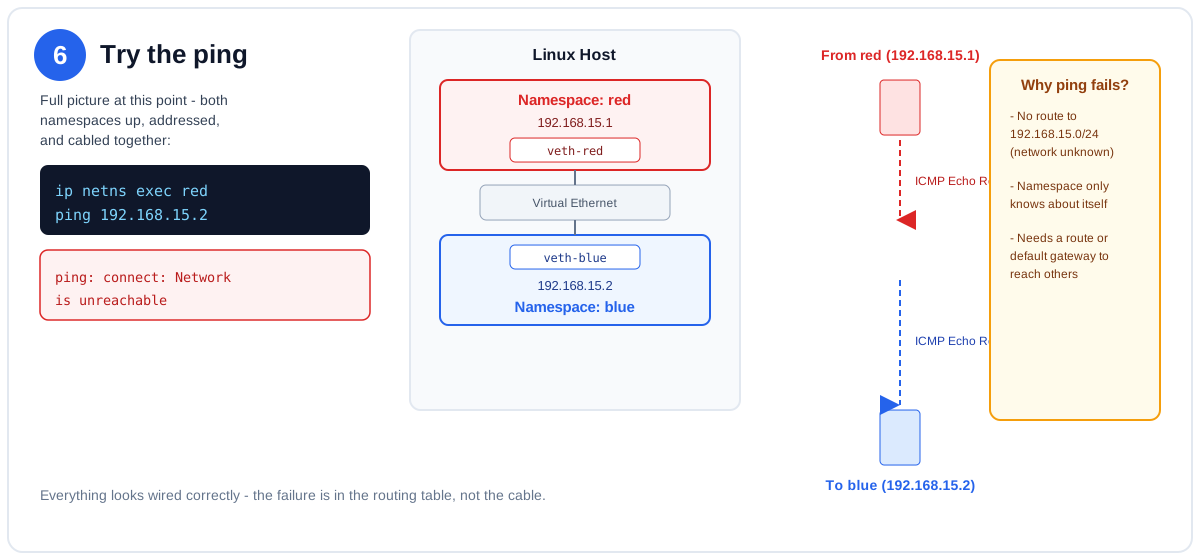
ip netns exec red ping 192.168.15.2
ping: connect: Network is unreachable
Everything above looks correct — two namespaces, a live cable between them, both ends addressed on the same subnet. And yet it fails.
If you're following along: how to check your setup at each point
A veth end is just an interface — nothing more — so the way you inspect it depends entirely on where that interface currently lives.
Before it's moved into a namespace, both ends still belong to the host, so a plain ip link on the host shows them like any other interface:
ip link show veth-red
ip link show veth-blue
After it's moved into a namespace, it's gone from the host's ip link output entirely — it now belongs to that namespace's own network stack, so you have to look from inside the namespace to see it:
ip netns exec red  ip link show veth-red
ip netns exec red  ip addr  show veth-red   # confirms the IP actually attached
If ip link show veth-red on the host still lists it after step 3, the ip link set veth-red netns red move didn't happen. If ip netns exec red ip addr show veth-red comes back with no inet line, step 4's ip addr add either didn't run or targeted the wrong namespace. Checking this way — host-side before the move, namespace-side after — is a quick way to confirm each step actually landed before moving to the next one, rather than only finding out something's wrong once the ping fails.
Why it breaks
ip addr add 192.168.15.1 dev veth-red with no prefix defaults to /32. A /24 gets Linux to auto-install a scope link connected route covering the whole subnet — but a /32 doesn't get one at all. The only thing the kernel adds for a /32 is a local scope-host route in the local table (table 255), which plain ip route doesn't even show. So checking red's main routing table:
ip netns exec red ip route
comes back completely empty — no route to 192.168.15.2, and no route to anything else either. Per the routing-then-ARP order above, the kernel refused the packet before it ever tried to resolve a MAC address. That's also why arp -a came back empty: ARP was never attempted.
The fix
Two options, and they teach different things.
Manual route (what I did first, to see the mechanism explicitly):
ip netns exec red  ip route add 192.168.15.2/32 dev veth-red
ip netns exec blue ip route add 192.168.15.1/32 dev veth-blue
Correct address from the start (what you'd actually do):
ip -n red  addr add 192.168.15.1/24 dev veth-red
ip -n blue addr add 192.168.15.2/24 dev veth-blue
A /24 address makes Linux install the connected route (192.168.15.0/24 dev veth-red) automatically — no manual route needed, and the first ping just works.
Step 2 — A real bridge, not a direct link
A direct veth pair only ever connects two namespaces — one cable, two ends, nothing else can plug in. Docker's bridge network needs to connect an arbitrary number of containers so they can all reach each other directly by IP address, with no router hop in between — the networking term for "a group of devices that can all reach each other this way" is an L2 segment (L2 = Layer 2, the Ethernet/MAC layer — it's called that because under the hood this direct reachability works by delivering frames straight to a MAC address, which is also why no L3/routing step is needed between them). A veth pair can only ever be a segment of two. Getting more than two devices onto one segment means introducing something that behaves like a switch — which is exactly what a Linux bridge is.
# create the bridge, this plays the role of docker0
ip link add br0 type bridge
ip addr add 192.168.15.254/24 dev br0
ip link set br0 up
Each namespace now gets a veth pair where one end stays on the host and joins the bridge, and the other end goes into the namespace:
ip netns add red
ip link add red-br type veth peer name veth-red   # the cable
ip link set veth-red netns red                    # one end into the namespace
ip link set red-br master br0                     # other end onto the bridge
ip link set red-br up                             # bring up the bridge-side end
ip netns exec red ip link set veth-red up         # bring up the namespace-side end
ip netns exec red ip link set lo up               # loopback, off by default in a new netns
ip netns exec red ip addr add 192.168.15.1/24 dev veth-red

ip netns add blue
ip link add blue-br type veth peer name veth-blue
ip link set veth-blue netns blue
ip link set blue-br master br0
ip link set blue-br up
ip netns exec blue ip link set veth-blue up
ip netns exec blue ip link set lo up
ip netns exec blue ip addr add 192.168.15.2/24 dev veth-blue
That's the topology so far — red and blue bridged together, host on the same segment via br0:
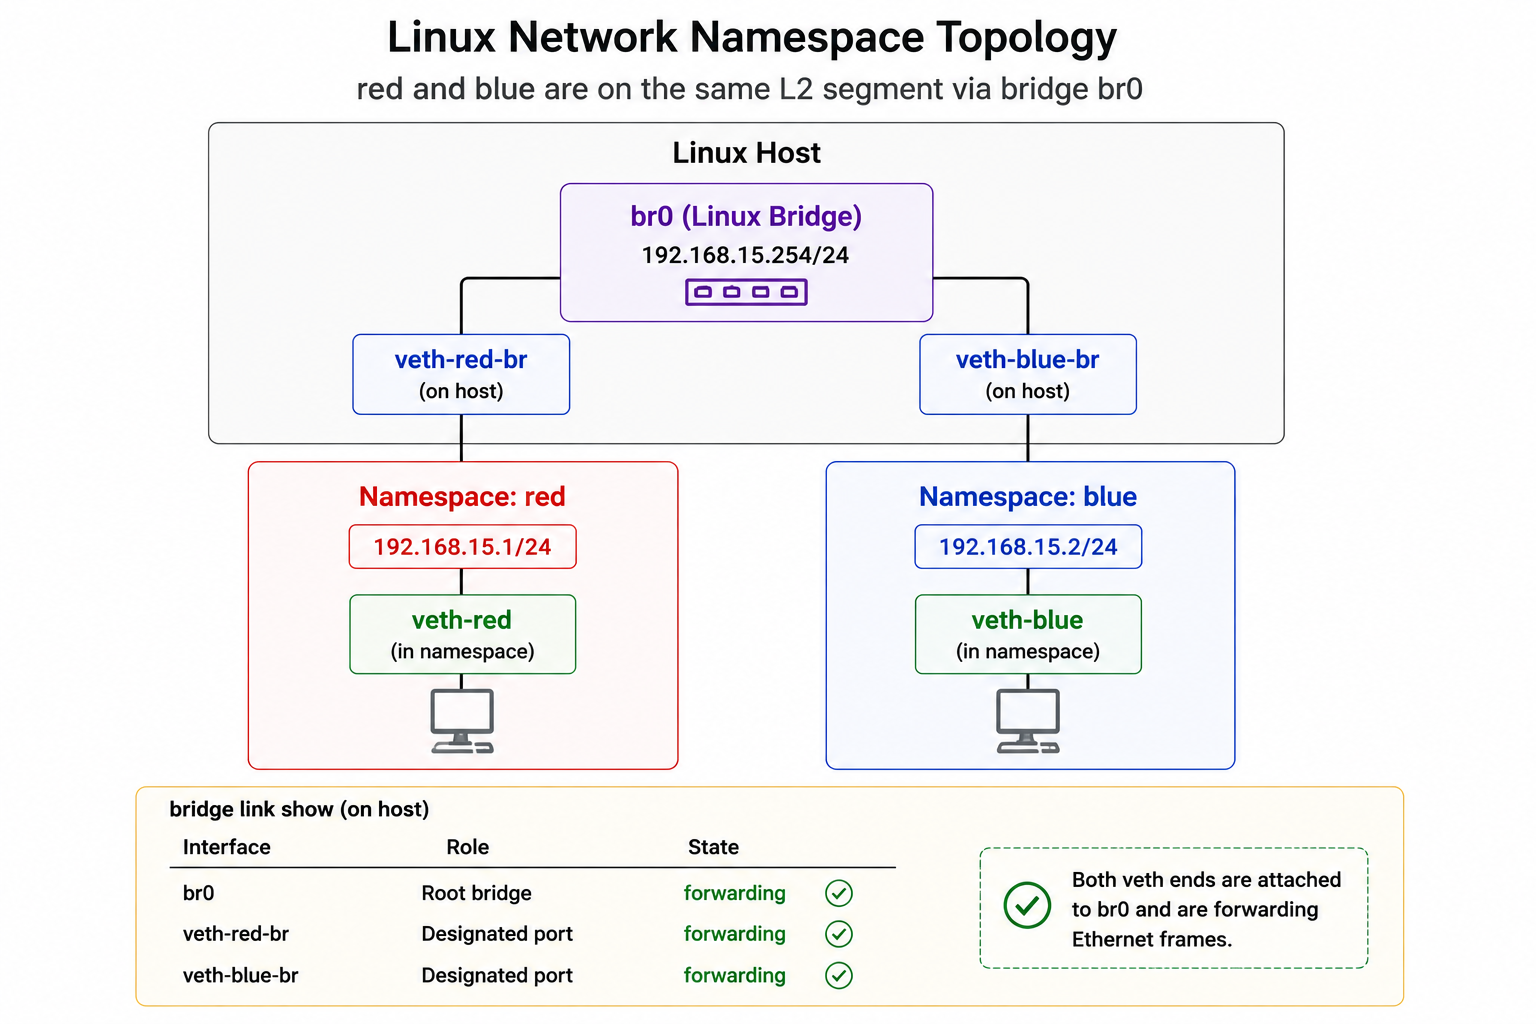
bridge link confirms both ends are attached and forwarding:
4: red-br@if5: master br0 state forwarding
6: blue-br@if7: master br0 state forwarding
Adding a third namespace later, without touching the first two
This is the actual advantage of a bridge over a direct veth pair: growing the network doesn't require re-wiring anything that already exists. green joins with the exact same recipe, plugged into the same br0:
ip netns add green
ip link add green-br type veth peer name veth-green
ip link set veth-green netns green
ip link set green-br master br0
ip link set green-br up
ip netns exec green ip link set veth-green up
ip netns exec green ip link set lo up
ip netns exec green ip addr add 192.168.15.3/24 dev veth-green
bridge link now shows three ports on the same switch, red and blue completely undisturbed:
4: red-br@if5:   master br0 state forwarding
6: blue-br@if7:  master br0 state forwarding
8: green-br@if9: master br0 state forwarding
Pinging the bridge's own address from inside a namespace confirms L2/L3 connectivity end to end, and ip neigh shows the ARP entries actually being learned and aged (STALE, REACHABLE, DELAY are normal ARP cache states, not errors):
ip netns exec red ping -c3 192.168.15.254
192.168.15.2   dev veth-red lladdr 6e:9b:cd:54:59:a9 STALE
192.168.15.254 dev veth-red lladdr 36:df:0f:4f:46:b9 REACHABLE
This br0 setup is functionally what docker0 is — a bridge with a private subnet, one leg into every container's namespace.
Step 3 — DNS inside a namespace
What I did
Copied the host's /etc/resolv.conf straight into red and tried:
ping google.com
Temporary failure in name resolution
(ping 8.8.8.8 worked fine at the same time — so this was purely DNS, not routing.)
Why it breaks
The host's resolv.conf said:
nameserver 127.0.0.53
Every network namespace gets its own loopback interface. 127.0.0.53 inside red is red's own loopback — and nothing is listening there. On the host, systemd-resolved owns that address; inside the namespace it resolves to nothing.
The right mental model: treat a namespace like a separate physical machine. Two machines both having a service on 127.0.0.53 doesn't mean they can reach each other's — loopback never leaves the box (or the namespace).
The fix
Give the namespace its own resolver config that points at something actually reachable, using Linux's per-netns resolv.conf override:
mkdir -p /etc/netns/red
cat <<EOF > /etc/netns/red/resolv.conf
nameserver 8.8.8.8
nameserver 1.1.1.1
EOF
Any ip netns exec red ... command automatically picks up /etc/netns/red/resolv.conf instead of the global one. Repeat per namespace.
This is also, not coincidentally, exactly what Docker does — except instead of pointing containers at 8.8.8.8, Docker points them at 127.0.0.11, its own embedded DNS server, which is what lets curl http://db resolve a container by name.
Step 4 — Resolving namespaces by name, like Docker's embedded DNS
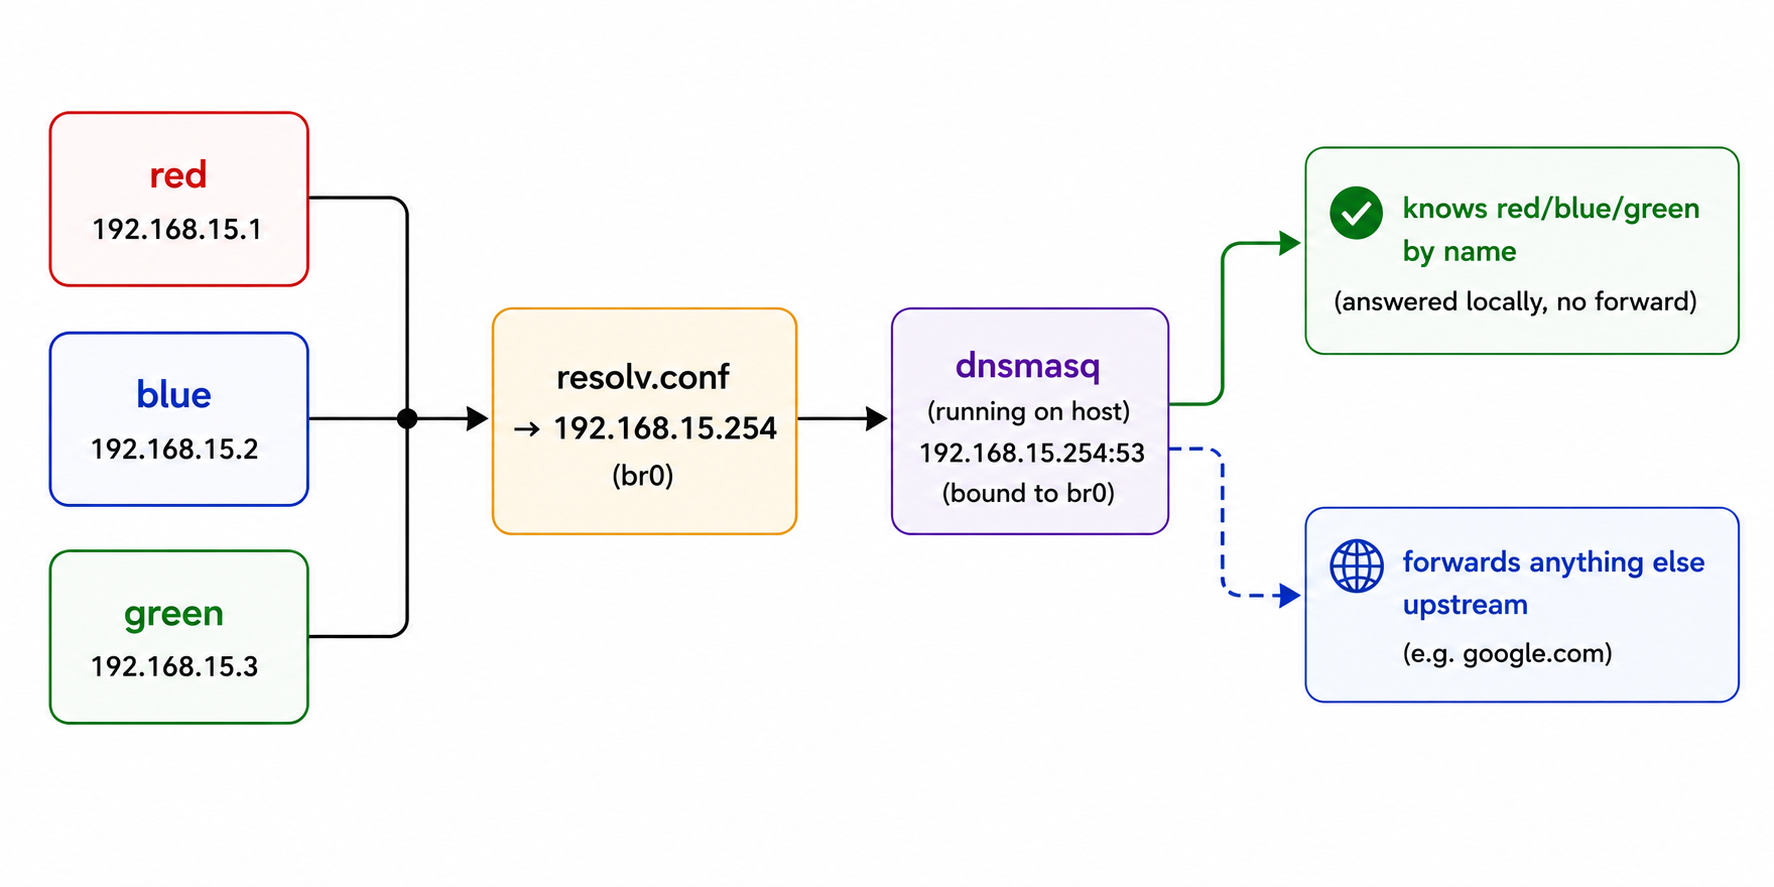
Step 3 fixed external DNS — red can now resolve google.com. But it still can't resolve blue or green by name, and that's the actual feature people mean when they say "Docker gives you DNS": inside a container you can curl http://db and it just works, because Docker runs its own tiny DNS server at 127.0.0.11 that knows every container's name and IP on that network.
That's a real DNS server, not a config trick — so this step builds one, using dnsmasq, and points every namespace at it.
Goal:
1. Install dnsmasq on the host
apt update
apt install -y dnsmasq
2. Give it a hosts file mapping namespace names to their bridge IPs
cat <<EOF > /etc/dnsmasq-bridge-hosts
192.168.15.1 red
192.168.15.2 blue
192.168.15.3 green
EOF
3. Bind it to the bridge only, not the whole host
This matters — the host is probably already running systemd-resolved on 127.0.0.53, and dnsmasq needs to stay out of its way by only listening on br0's address:
mkdir /etc/dnsmasq.d
cat <<EOF > /etc/dnsmasq.d/bridge.conf
interface=br0
bind-interfaces
listen-address=192.168.15.254
addn-hosts=/etc/dnsmasq-bridge-hosts
no-dhcp-interface=br0
no-resolv
server=8.8.8.8
server=1.1.1.1
EOF
4. Restart dnsmasq to pick up the new config
systemctl restart dnsmasq
5. Point every namespace's resolver at the bridge, not at a public DNS server
for ns in red blue green; do
  mkdir -p /etc/netns/$ns
  echo "nameserver 192.168.15.254" > /etc/netns/$ns/resolv.conf
done
6. Test it
ip netns exec red ping -c2 blue
ip netns exec red ping -c2 google.com
Both succeed — but for different reasons. blue is answered instantly out of dnsmasq's own hosts file, no network round-trip beyond the bridge. google.com isn't in that file, so dnsmasq forwards the query upstream to whatever public resolver it's configured to use (by default, whatever the host itself uses) and relays the answer back. One resolver, two behaviors — exactly how Docker's 127.0.0.11 behaves: known container names answered locally, everything else forwarded.
Step 5 — Internet access from a namespace
With DNS solved, a namespace can resolve names but still can't reach the outside world unless two separate things are both true: the host is willing to forward and masquerade its traffic, and the namespace actually knows to send that traffic toward the bridge in the first place. Docker configures both of these automatically — miss either one and the namespace looks broken even though the other half is perfectly correct.
A quick note before running any of this: the commands below use eth0, but that's not guaranteed to be your outbound interface. Modern EC2 instances (Nitro-based) usually expose it as ens5 instead. Before running these commands, confirm your actual interface with:
ip route get 8.8.8.8
The dev field in the output tells you the right name to swap in — ens5, eth0, or whatever it is on your box.
1. Host side — enable forwarding and NAT outbound traffic
# let the kernel forward packets between interfaces at all
sysctl -w net.ipv4.ip_forward=1

# masquerade namespace traffic as the host's own IP on the way out
iptables -t nat -A POSTROUTING -s 192.168.15.0/24 -o eth0 -j MASQUERADE
iptables -A FORWARD -i br0 -o eth0 -j ACCEPT
iptables -A FORWARD -i eth0 -o br0 -m state --state RELATED,ESTABLISHED -j ACCEPT
MASQUERADE rewrites the source address of outbound packets from 192.168.15.x to the host's real interface address, and rewrites it back on the reply — the exact mechanism NAT routers use for an entire home network, applied here per-bridge.
2. Namespace side — give each namespace a default route
This part's easy to skip, and skipping it fails in a way that looks like step 1 didn't work, even when it did. Each namespace only has one route so far — the connected 192.168.15.0/24 route auto-installed back in Step 2, which only covers traffic to red/blue/green/the bridge itself. It has no route at all for 8.8.8.8 or anything else outside that /24, so the packet never leaves the namespace — the exact same "no route = no ARP = unreachable" mechanism from Step 1's original bug, just one layer further out. sysctl/MASQUERADE never get a chance to run, because the packet doesn't even make it to the bridge.
ip netns exec red   ip route add default via 192.168.15.254
ip netns exec blue  ip route add default via 192.168.15.254
ip netns exec green ip route add default via 192.168.15.254
3. Test it
ip netns exec red ping -c3 8.8.8.8
With both pieces in place, red can now reach the real internet.
Step 6 — Reaching a namespace's service from outside
This is the reverse direction — docker run -p 8080:80 — and it's the one with the sharpest edge case.
Goal:
Host:8080 → DNAT → 192.168.15.1:80 (red)
With a server running inside the namespace:
ip netns exec red python3 -m http.server 80
The DNAT rule for traffic arriving from outside the host:
iptables -t nat -A PREROUTING -p tcp --dport 8080 \
  -j DNAT --to-destination 192.168.15.1:80

iptables -A FORWARD -p tcp -d 192.168.15.1 --dport 80 -j ACCEPT
From another machine, http://<EC2_PUBLIC_IP>:8080 now serves the namespace's directory listing.
The gotcha: running curl localhost:8080 on the EC2 host itself does not hit that rule. Locally-generated traffic never passes through PREROUTING — it goes through OUTPUT instead:
External client → PREROUTING → DNAT → FORWARD → red
Local process (curl on host) → OUTPUT → (PREROUTING never runs)
To make localhost:8080 work for local testing, you need a second DNAT rule specifically in OUTPUT:
iptables -t nat -A OUTPUT -p tcp -d 127.0.0.1 --dport 8080 \
  -j DNAT --to-destination 192.168.15.1:80
You can watch the rule fire with the packet counters:
iptables -t nat -L -n -v
Docker installs both kinds of rules for exactly this reason — docker run -p needs to work both from the outside and from curl localhost on the Docker host.
Final topology and Docker feature parity
Putting Steps 1–6 together, the end state is a single bridge network carrying three isolated namespaces — two attached first, a third attached later without disturbing them — with DNS, outbound internet, and one exposed service:
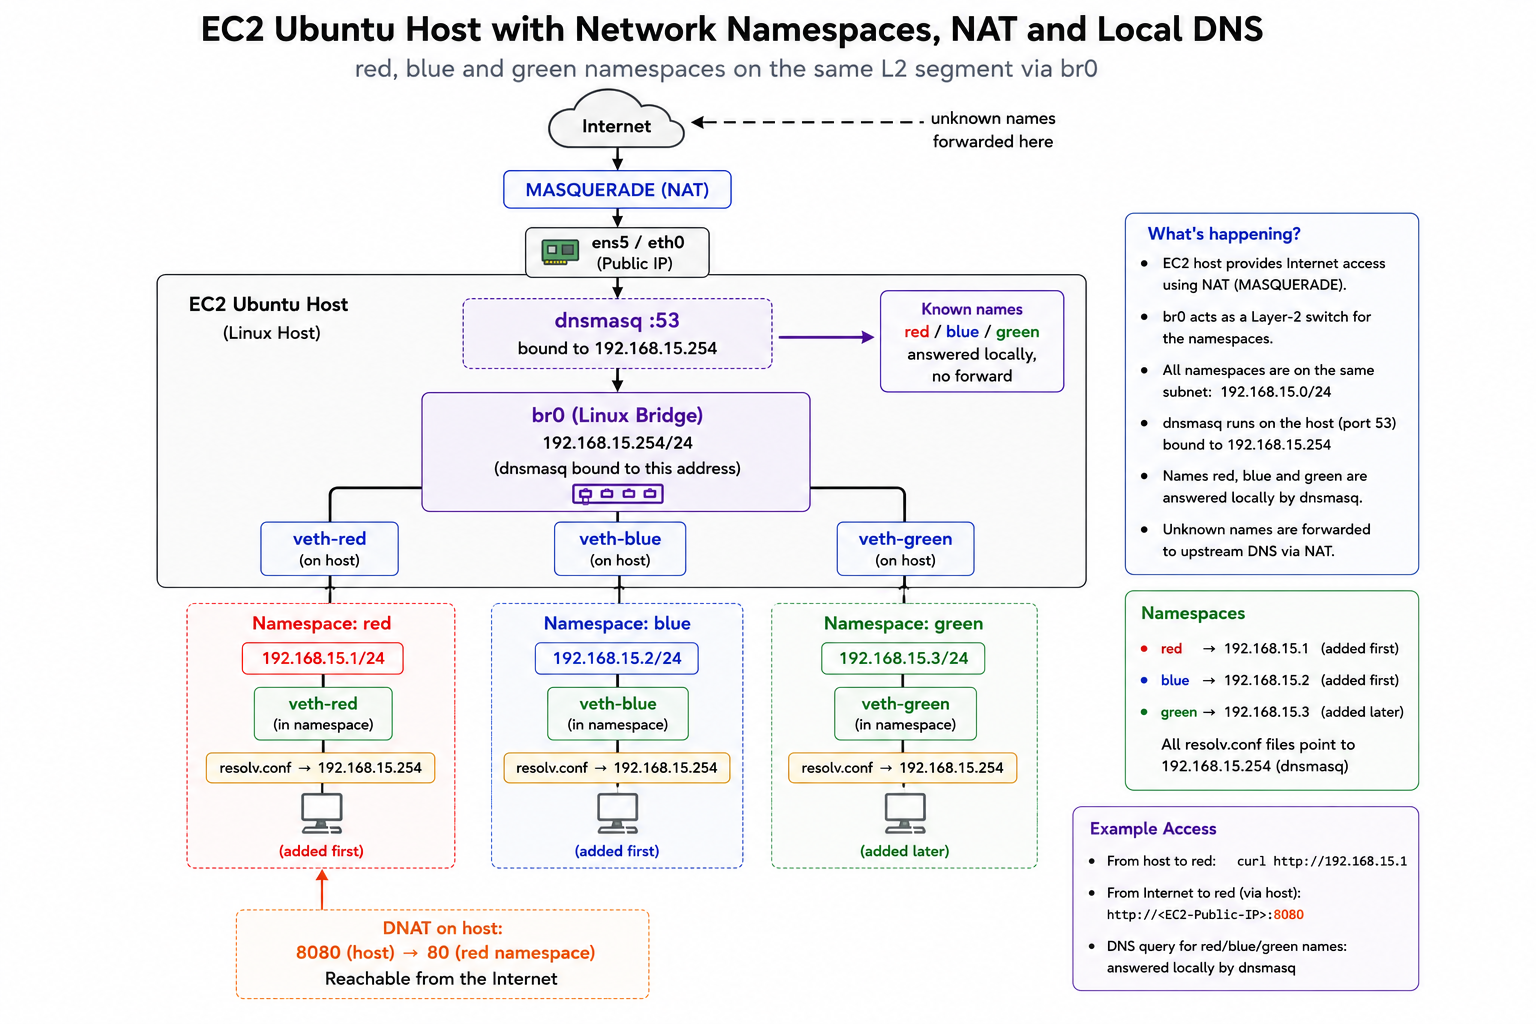
| Docker bridge network feature | Built with |
|---|---|
| Container isolation | ip netns |
| Virtual NIC per container | veth pairs |
Virtual switch (docker0) |
br0 Linux bridge |
| Dynamic container attach/detach | veth + bridge master, no rewiring of existing ports |
| Internet access | ip_forward + iptables MASQUERADE |
| Container-name DNS | dnsmasq bound to br0, namespaces pointed at it via /etc/netns/<ns>/resolv.conf |
-p hostPort:containerPort |
iptables DNAT in PREROUTING + OUTPUT |
None of this is new — it's precisely the stack dockerd sets up for you on every docker network create and docker run. Building it by hand once makes every one of those one-liners legible afterward: a routing table miss, a stale loopback DNS entry, and a PREROUTING/OUTPUT split all stop being "Docker magic" and start being ordinary Linux you've already debugged yourself.
Reference
All the scripts from this post — namespace/veth setup, the bridge network, DNS via dnsmasq, internet access, port forwarding, and a full cleanup script — are on GitHub: https://github.com/Nitin-Poojary/docker-network-from-scratch
git clone https://github.com/nitinpoojary/docker-network-from-scratch.git
cd docker-network-from-scratch
sudo ./02-bridge-network.sh
sudo ./03-dns-resolution.sh
sudo ./04-internet-access.sh
sudo ./05-port-forwarding.sh
01-direct-veth-pair.sh is the standalone Step 1 demo; cleanup.sh tears everything down.